1. Assets #
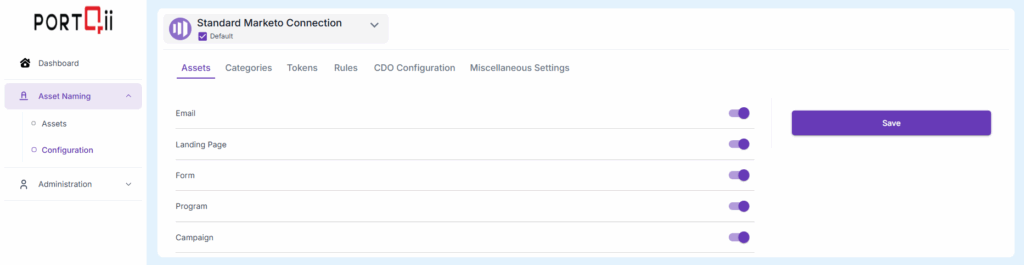
The Assets section displays a few available Marketo asset types, each accompanied by a toggle button. These toggles control which asset types are available for creation or modification. This configuration ensures teams only see and work with asset types relevant to the organization’s workflow.
1.1. Available asset types are: #
- Contact List
- Landing Pages
- Forms
1.2. To activate asset types: #
1. Go to the Homepage and click on Asset Naming.
2. Then select Configuration.
3. The Assets tab opens by default, where users can enable the required asset types using the toggle buttons.
2. Categories #
Categories allow users to build a list of fields that appear when creating or modifying any asset. The values entered in these fields are used to generate the asset name.
2.1. There are three types of categories: #
- Textbox
- Date
- Picklist
2.2. Common fields for all category types include: #
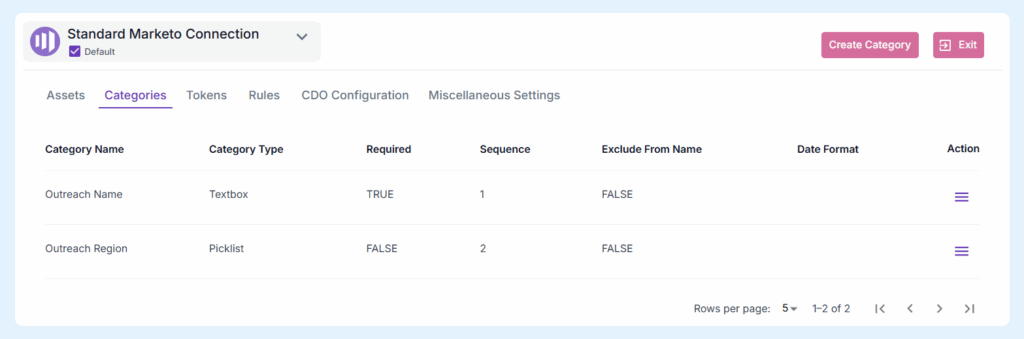
1. Sequence – Defines the position of the category while creating or modifying an asset name (e.g., a sequence value of 2 places it second on the Create/Edit Asset page).
2. Required – Marks the field as mandatory while creating or modifying an asset name. This can be enabled using a checkbox.
3. Exclude from name – When checked, this category does not affect the asset name but can still be used as an attribute in reports.
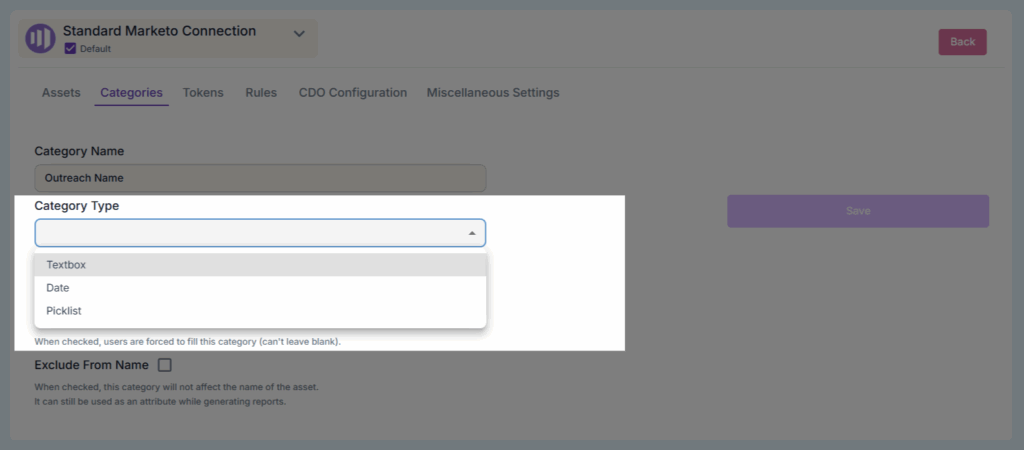
2.3. To set up or configure a new category: #
1. Click on Category Tab and then, click on Create Category button

2. Enter the Category Name
3. Select a Category Type (Textbox, Date, or Picklist).
4. Specify the Sequence Number to define the display order of the category fields while creating or modifying an asset.
5. Enable the Required checkbox if the category must be filled out by users.
6. Select Exclude from Name if the category should not appear in the asset name but still be available as an attribute for reporting.
7. All created Categories will be visible under Categories list page.
2.4. For Picklist categories, options can be managed after creation of category. #
1. Navigate to the Category List page.
2. Click the hamburger button next to the desired Picklist category.
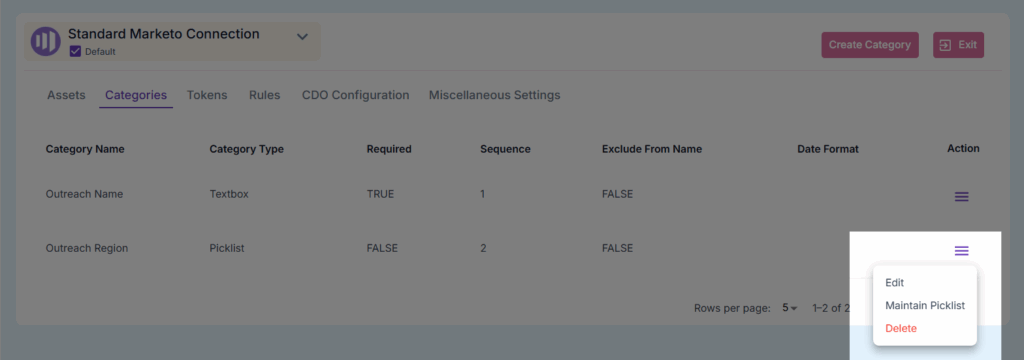
3. Select Maintain Picklist.
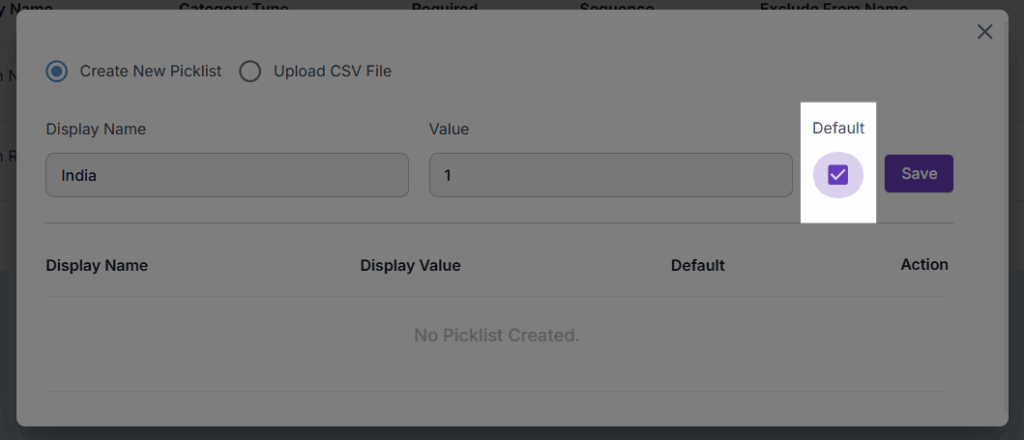
4. A pop-up window will appear where options can be added manually by entering a Name and Value.
5. One option can be marked as the default by selecting the corresponding checkbox.
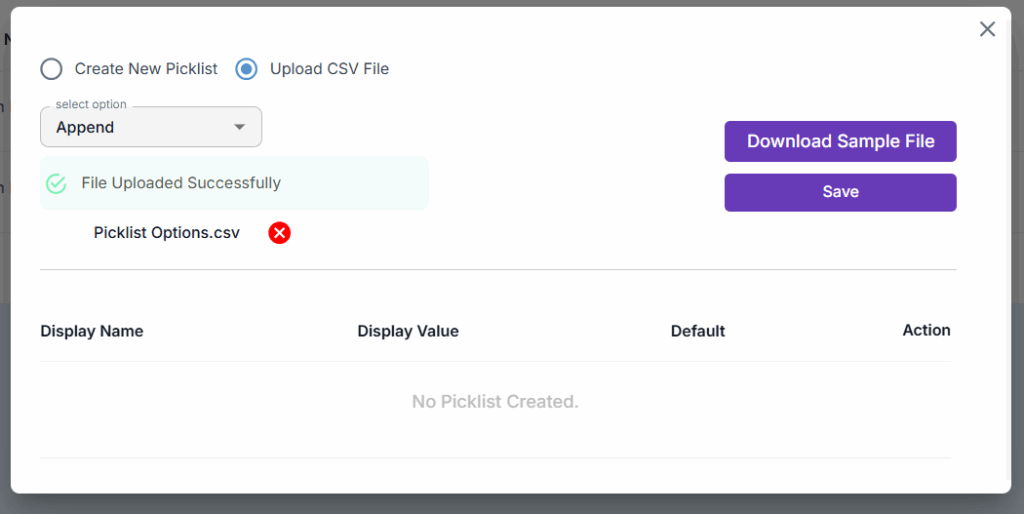
6. When there is a large number of Picklist options, click on Upload CSV File feature.
7. Select Append to add new picklist options or Overwrite to update the existing picklist options.
8. Upload the CSV file containing picklist options from your local system and click on Save button.
3. Tokens #
Tokens allow users to dynamically populate content across assets.
3.1. Steps: #
1. Create Tokens.
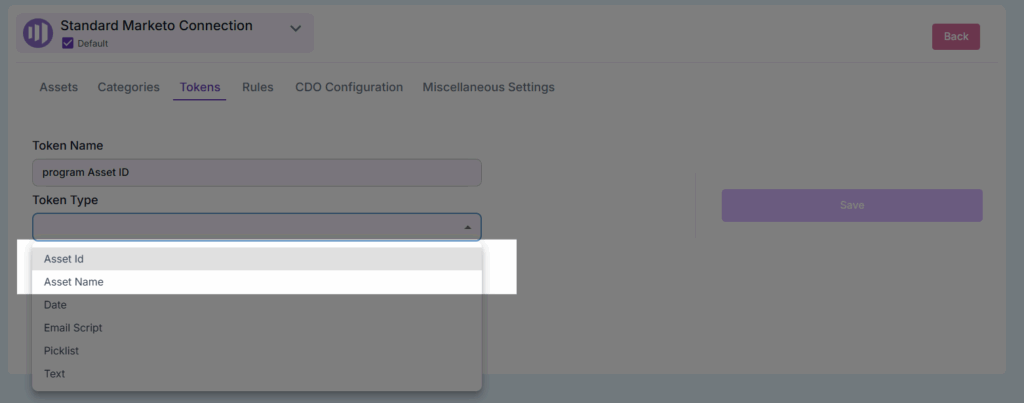
2. Enter the Token Name and select a Token Type.
Note: If the user selects ASSET ID, the program ID will be automatically generated upon program creation. The same applies to ASSET Name.
3. Enter the Sequence Number to define the display order of tokens in the Asset Editor.
4. If the field is mandatory, enable the Required checkbox (if available).
5. Click Save to complete token creation.
Note: If the Token Type is Picklist, users can manage token options similar to the Categories section by adding options manually or via the Upload CSV File option.
4. Rules #
The Rules tab defines how asset names are structured and formatted. It provides options to control separators, automatic additions, and the categories that influence asset naming.
4.1. Separator Type #
Separators improve readability in asset names. Common examples include underscores (_), hyphens (-), or other characters, depending on the organization’s naming convention.
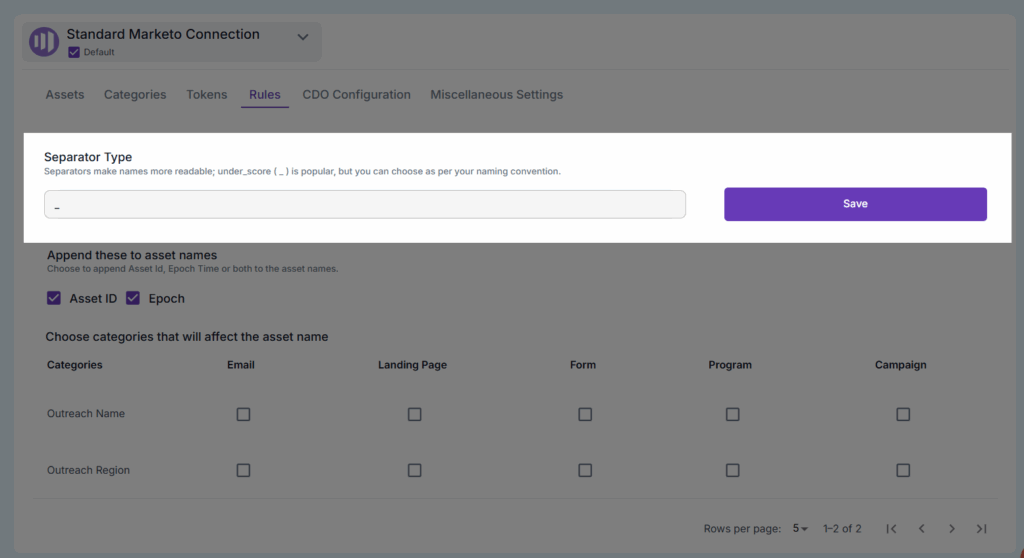
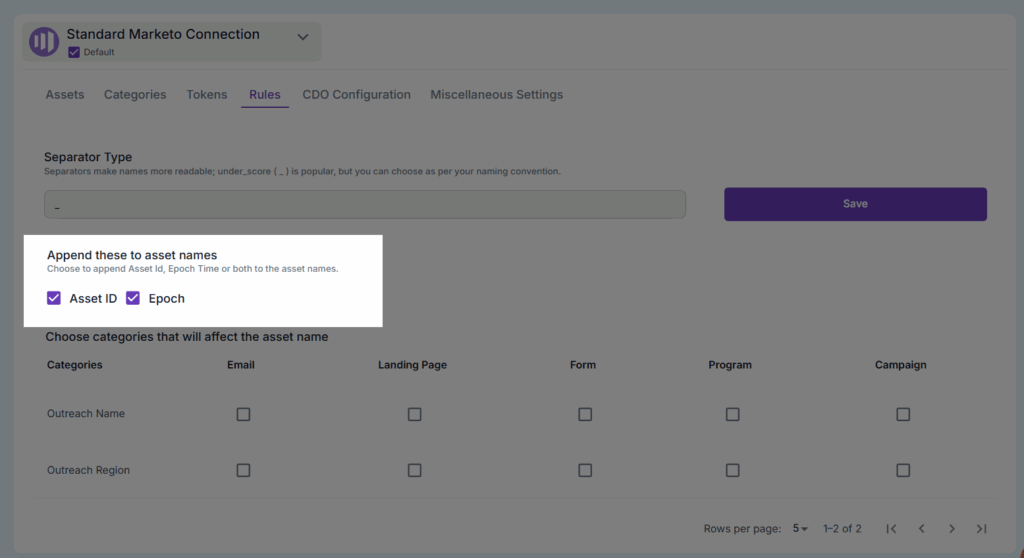
4.2. Append to Asset Names #
This section allows automatic addition of predefined elements to asset names. Two available options are:
- Asset ID – Appends the system-generated ID to ensure uniqueness.
- Epoch – Appends a timestamp-based value for tracking and identification.
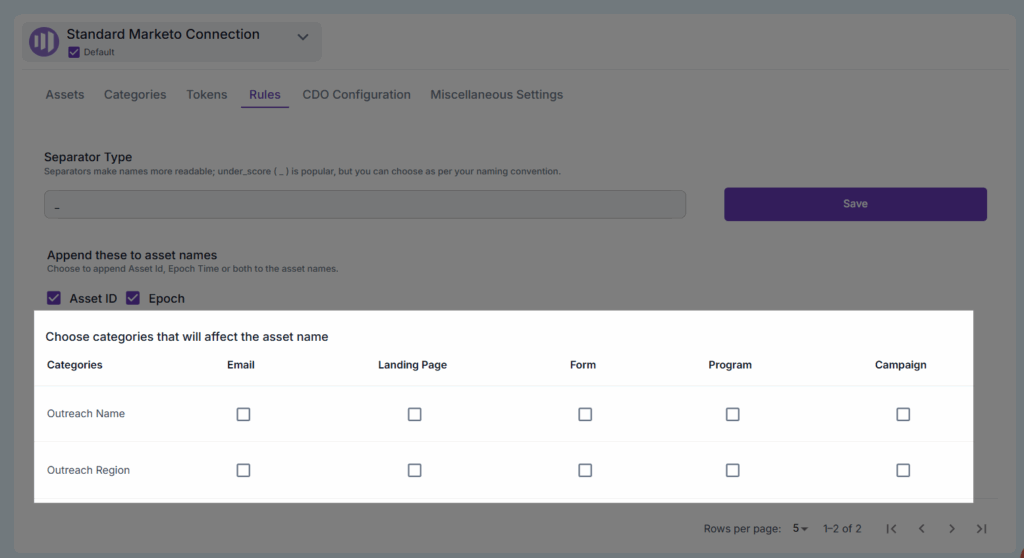
4.3. Choose Categories Affecting Asset Names #
Enable checkboxes for each category to specify which ones apply to different asset types.
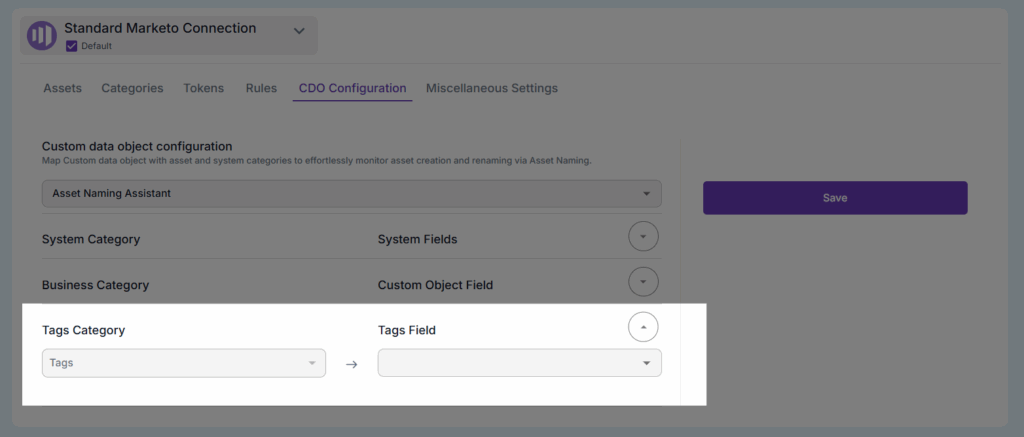
5. CDO Configuration #
Map Custom Data Objects (CDO) with asset and system categories to effortlessly monitor asset creation and renaming via Asset Naming.
5.1. Steps: #
Note: Before configuring a CDO, at least one CDO must be created in the Marketo platform.
1. Click on the dropdown and select a CDO.
2. Three types of options are available:
a. System Categories: These are Marketo-defined categories. Users can perform field mapping by selecting respective fields for each option.
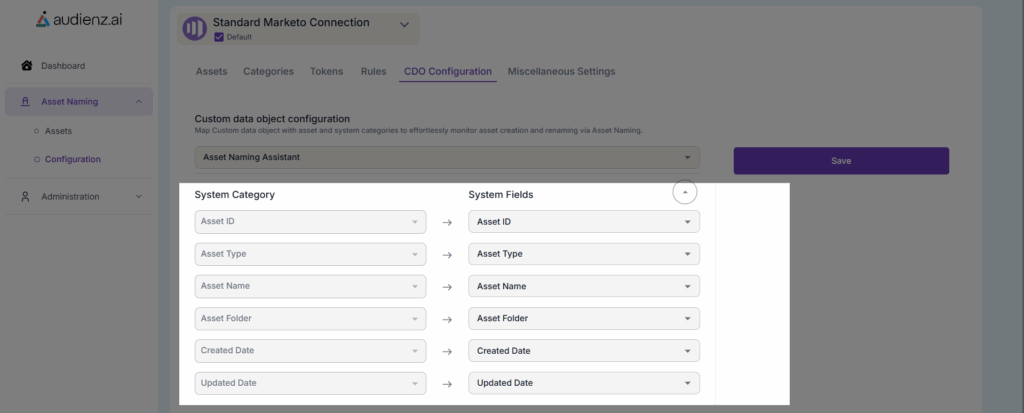
b. Business Categories: These categories appear once any custom categories are created under the Categories section in Asset Naming Configuration.
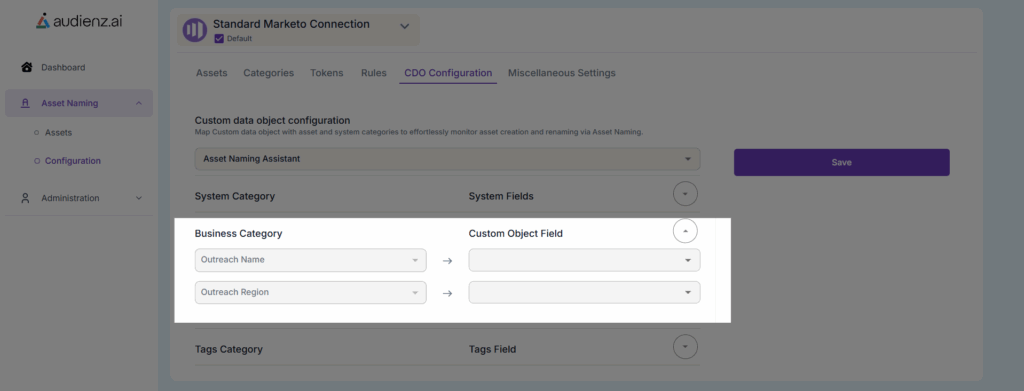
c. Tag Categories: Categories based on tags that allow flexible classification of assets.
6. Miscellaneous Settings #
This section contains additional configuration options to further refine ANA’s functionality within Marketo.
6.1. Asset Tagging: Enable tags to allow users to tag their assets. Tagging simplifies searching and analyzing assets. Use the toggle button to activate this feature.

6.2. Character Restrictions: Disallow specific characters in asset naming. Click Expand, enter restricted characters, and click Save.

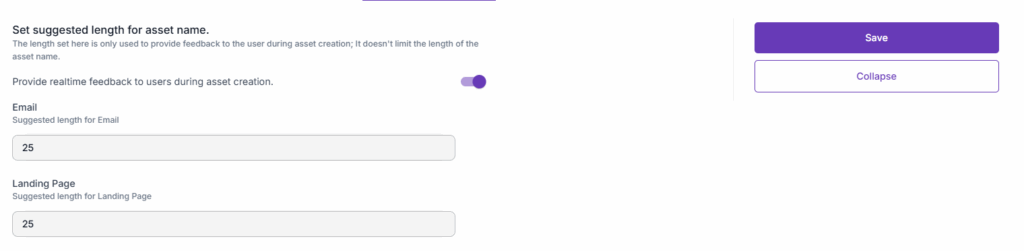
6.3. Suggested Asset Name Length: Set a suggested name length to provide user feedback during asset creation. This does not restrict the actual length of asset names.
6.4. Configure Default Email Parameters: Define workspace details such as sender name, sender email, and reply-to address.

Steps:
a. Click on Add Configuration.
b. Enter the Workspace and Name.
c. Enter From Address and Reply-To Address.
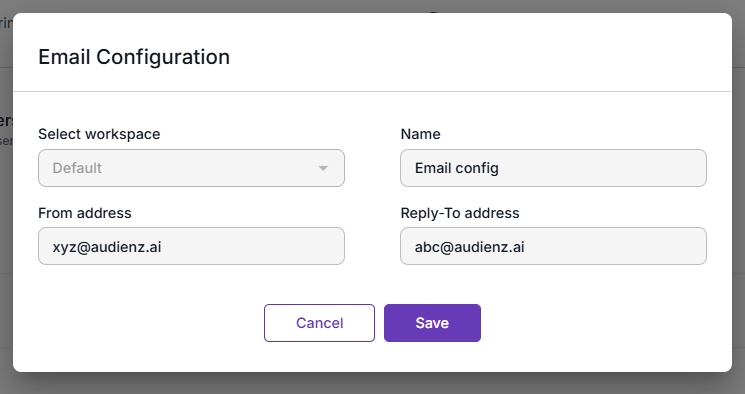
d. Click Save.
6.5. Configure UTM Parameters: Set and manage UTM parameters for tracking.

Steps:
a. Click Add Fields.
b. Enter Parameter Name and Parameter Value.
c. Click Save.
6.6. Export UTM Links for Marketo Assets: Download a CSV of Marketo assets with UTM details filtered by creation date range.
- Choose All or Custom and click Download.

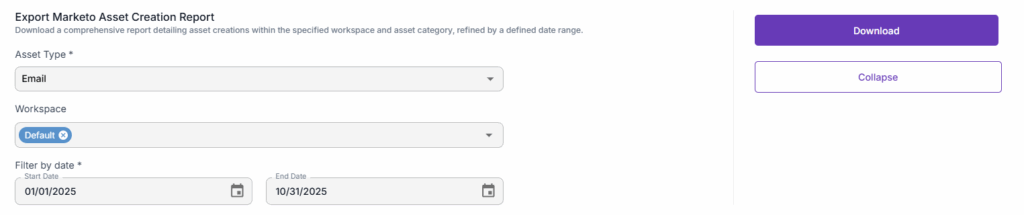
6.7. Export Marketo Asset Creation Report: Download a comprehensive report of asset creations filtered by workspace, asset category, and date range.
- Select Asset Type, Workspace, Start Date, and End Date, then click Download.